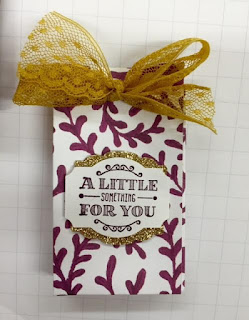
However, to make up for it, below I've given you all the instructions on how to make these quick and easy money bag/gift card bags .... I promise, they are beyond easy, and I managed to make 12 decorated bags in less than an hour - I swear!
This is a great project for using up scraps of paper and card stock, as the size you start with is only 4" x 5 1/2" - meaning that you can get 4 bags from one A4 sheet or 6 bags from a 12x12 sheet.
How cute are these?!?!?!
There are so many different ways that you can decorate them, and I used just the one stamp set! It's called A Little Something, and as you can see, it can be used for lots of different occasions, and can also be used for producing amazing backgrounds .... and such great value at only £15 for all these stamps! (unmounted) The link is HERE I used two punches for the sentiments - the label bracket punch - which is current ... sadly, the other punch is discontinued,but you could use a circle punch instead. The paper I used is called Into The Woods HERE and Farmers Market HERE
I added bits of ribbon, clips, pegs etc. etc... but you can use up anything you want. On the right hand card, I punched out a window and added a scrap of window sheet behind it (so that nothing fell out) .. I punched three flowers, the sentiment and voila another bag made of scraps! Easy!
Here's a close up of two of the bags
So ... here we go with the instructions ....
Money Bag / Gift Card Holder INSTRUCTIONS
You can make 4 bags from 1 A4 sheet of paper. Finished size is
approx ½” deep x 2” x 3 ½”
To start you will need a piece of card measuring 5 ½” x 4”
(or 13cm x 10cm)
- Score on the long side at 2”, 2 ½”, 4 ½”, 5” or (5,6,11,12 cm)
- Score on the short side at ½” (1cm)
- Burnish all the folds
- Snip out the little corner where the folds meet on the bottom, then snip upwards to the score line on the other three short score lines
- Now close up the bag using double sided tape, tape runner etc. on the short flap side (you will see what I mean once you have scored the bag), then add tape to one of the longer bottom flaps.
- Pop in your money or gift card, and pinch the top sides of the box together
- punch two little holes to thread ribbon through and add your ribbon to close the top
- That's it - you can decorate it now!
My direct shop link is HERE
Have fun! Cal xxxxxxx
Built for Free Using: My Stampin Blog
![he[art]fully yours - creating with he[art]](https://blogger.googleusercontent.com/img/b/R29vZ2xl/AVvXsEh217KwX3TLdo2fBxYOKndmZWsTQ7hYbft_1QRdMnWwsufg0-Dt8zqpVkVsbabi6Er6x5CNGtGXAP7J5ExAQYv-qg4Ufd_-Qhnr9rY7LzToTXrNg-bDHBANx5_UjOVcuKhnoeAkk9ksqE6-/s1600/Blog+header.jpg)


No comments:
Post a Comment
Thank you for taking the time to comment x